I haven't posted for a while, but here are some further developments.

The far wall was plastered to prepare for the
combi-boiler that we are having installed.

The old system is behind that old gas fire that you can see. It is a back boiler and is hidden in the chimney breast. Our plumber tells us he would have condemned it if we had had him in to fix it. Instead we said, "rip it out, please".

The side walls of the neighbours house need rendering as well.

Above is the north side of our extension which we will never see as it is in the neighbours yard and the fence will be fixed to the corner of the wall.

First the grading goes on to prepare for the top coat.

Then the final render is applied.

Here a pit is dug and concrete poured to prepare a base for the step. Right now it is a bit of a drop out the door to the ground.

And here is the finished step. Our brickie is amazing.

The sewage waste has to be dropped to the level of the ground. We must have access to this. This was a consideration when deciding if we wanted our extension to come out further. It would have had to come out enough that this sewage hatch was accessible from the middle of our kitchen. Since our yard is only 30 feet long we opted to stop right before it. Sewage and kitchen just don't seem like a good mix in my mind.

If you pop the lid off you can take a peak at an original Victorian sewage.

A closer look and you can see three waste pipes running out of the brick side that comes from our house. The shiny stream at the bottom is a Victorian open sewage system. This runs through every yard down the block and each house has drains like ours that pour into it. So if you are bored you can sit and watch things float by from all your neighbours: dinner scraps being rinsed down a drain, a toilet being flushed, a washing machine emptying. The water looked surprisingly clean when I peered down it.

And here is the newly lowered and tidied up sewage drain (and cover).

The gas fire has been ripped out along with the back boiler. We mark lines on the wall where we want the opening enlarged.

A cement lintel is put in to support the weight so that we can install a wood burning stove (the pot bellied variety).

The new
combi-boiler is also installed and fixed to the kitchen wall which will be enclosed in one of the cupboards. This little unit will heat water only as we need it. It also heats the water for our radiators. So if this breaks we have no heat and no hot water. The back up is our electric shower (a common thing in the UK), which is a small unit on your shower wall that heats cold water as it comes out. Then all you need is the water from your mains and electricity. If your boiler, electricity and water mains go...well, then you are just in trouble, aren't you? Maybe we can dip into that sewer.

Of course, pipes, electrics and things like that have to either sit on the outside of the wall, be sunk under floor boards, or have a channel carved out in the brick walls to accommodate them. The back of houses have all the waste pipes running on the exterior since the walls are solid. (See below for a picture)

The wall paper is stripped away to reveal different markings of shelving from the last 100 years. The new plaster will be applied directly to the old.

The ceiling gets new plaster boards in place of the old lathe and plaster. These days it is plaster board and then plaster.

The roof of the extension gets a thick foil insulation applied.

The bathroom pipe from upstairs is covered in insulation to deaden the sound of water flowing while in the kitchen.

We go away for a few days and return to a completely plastered room.

It does make such a difference.

The fireplace looks great too.

The whole room looks great. Pink is not the colour we have chosen, but the colour of the plaster.

We begin a base coat of white.

But have not finished even that yet. More pictures when that is done.

Our back yard is finally clear from most of the builder's supplies and we can eat outside again.

At night we light candles and stay outside. Thankfully we have no foxes living in our yard (a problem in London).

The house so far. We are a bit desperate for a kitchen. Cooking in the hall on a hot plate and washing our dishes in the bathroom is getting tiring. I have almost lost interest in cooking these days, but hope getting a stove and a fridge changes that (and kitchen). Next project: wood floors and kitchen installation.
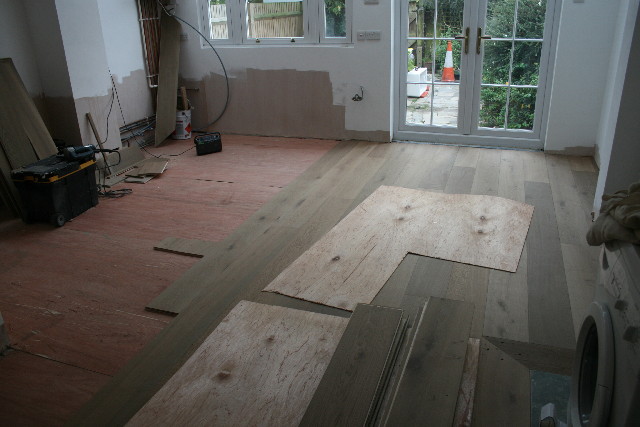 Above you can see the 4mm ply on the left that was put down to even things out just a bit more. And on the right you see the untreated oak engineered board. Engineered board has a layer of oak attached to a layer of plywood. This allows less oak to be used and less shrinkage and movement in the floor at large.
 These pictures are taken after two layers of oiling have dried.
 It is exactly the colour we want. Most people go for the really light oak, but we thought the mid range colour would bring a really warm feel to the room.
 We love it!
 The washing machine is currently sitting in the fireplace as it was the only piece that wasn't being wooded.
 The fitters put a nice wood feature around the green marble hearth (which we have yet to clean up).
 Wow.
Wow.


